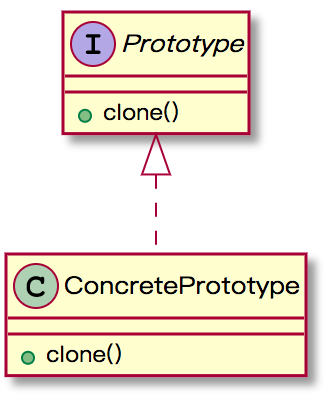
原型模式是创建型模式的一种,其特点在于通过“复制”一个已经存在的实例来返回新的实例,而不是新建实例。被复制的实例就是我们所称的“原型”,这个原型是可定制的
通过 new 产生一个对象需要非常繁琐的数据准备和访问权限
一个对象需要提供给其他对象访问,每个调用者都有可能修改其属性,可以原型模式拷贝多个对象供调用者使用,即保护性拷贝Object 类已经提供了一个 clone() 方法,查看源码可以得知,想要使用该方法,还要实现一个标识接口Cloneable ,clone() 源码:
1
2
3
4
5
6
7
8
protected Object clone () throws CloneNotSupportedException if (!(this instanceof Cloneable)) { throw new CloneNotSupportedException("Class " + getClass().getName() + " doesn't implement Cloneable" ); } return internalClone(); }
Java语言提供的Cloneable 接口和Serializable 接口的代码非常简单,它们都是空接口,这种空接口也称为标识接口,标识接口中没有任何方法的定义,其作用是告诉JRE这些接口的实现类是否具有某个功能,如是否支持克隆、是否支持序列化等
再来看看超级简单的示例代码:
具体原型类:
1
2
3
4
5
6
7
8
9
10
11
12
13
14
15
16
17
18
19
20
21
22
23
24
25
public class ConcretePrototype implements Cloneable private String name; public String getName () return name; } public void setName (String name) this .name = name; } @Override protected Object clone () throws CloneNotSupportedException return super .clone(); } @Override public String toString () return "ConcretePrototype{" + "name='" + name + '\'' + ", person=" + person + '}' ; } }
看着有没有特别的简单方便,但是这里面有一个坑在,这就牵扯到浅拷贝和深拷贝,上述的原型模式就是浅拷贝,也称为影子拷贝,如果需要拷贝的类中全部都是基础类型的属性,浅拷贝也是没有问题的,但是有引用类型的属性,就会出现问题了,出现问题的示例代码:
具体原型类:
1
2
3
4
5
6
7
8
9
10
11
12
13
14
15
16
17
18
19
20
21
22
23
24
25
26
27
28
29
30
31
32
33
34
35
36
37
38
39
40
41
42
43
44
45
46
47
48
49
50
51
52
53
54
55
56
57
58
59
60
61
62
63
64
65
public class Person private String name; private String age; public String getName () return name; } public void setName (String name) this .name = name; } public String getAge () return age; } public void setAge (String age) this .age = age; } @Override public String toString () return "Person{" + "name='" + name + '\'' + ", age='" + age + '\'' + '}' ; } } public class ConcretePrototype implements Cloneable private String name; private Person person; public String getName () return name; } public void setName (String name) this .name = name; } public Person getPerson () return person; } public void setPerson (Person person) this .person = person; } @Override protected Object clone () throws CloneNotSupportedException return super .clone(); } @Override public String toString () return "ConcretePrototype{" + "name='" + name + '\'' + ", person=" + person + '}' ; } }
Client类:
1
2
3
4
5
6
7
8
9
10
11
12
13
14
15
16
17
18
19
20
21
22
23
24
25
26
27
28
29
30
31
32
33
34
35
36
37
38
39
40
41
42
public class PrototypeActivity extends Activity @BindView (R.id.prototype_text) TextView mTextView; @Override protected void onCreate (Bundle savedInstanceState) super .onCreate(savedInstanceState); setContentView(R.layout.activity_prototype); ButterKnife.bind(this ); } @OnClick (R.id.prototype) public void prototype_click () ConcretePrototype concretePrototype = new ConcretePrototype(); concretePrototype.setName("Kevin" ); Person person = new Person(); person.setName("Person" ); person.setAge("10" ); concretePrototype.setPerson(person); StringBuilder stringBuilder = new StringBuilder("concretePrototype:" + concretePrototype.toString()); try { ConcretePrototype clone = (ConcretePrototype) concretePrototype.clone(); clone.setName("LoveDev" ); stringBuilder.append("\nclone: " ).append(clone.toString()); Person newPerson = clone.getPerson(); newPerson.setName("newPerson" ); newPerson.setAge("20" ); clone.setPerson(newPerson); stringBuilder.append("\n\n\nconcretePrototype: " ).append(concretePrototype.toString()); stringBuilder.append("\nclone: " ).append(clone.toString()); stringBuilder.append("\n\n\n 对比两个类中的 Person 字段是否相同:" ).append(concretePrototype.getPerson() == clone.getPerson()); mTextView.setText(stringBuilder); } catch (CloneNotSupportedException e) { e.printStackTrace(); } } }
第一次修改的时候,只改了具体原型类中的String类型,打印结果没有是问题的,只修改了克隆后的类,第二次修改Person字段,再次打印的时候,发现原型类已经被修改了,导致这个问题的原因是因为浅拷贝只是拷贝了引用地址,两个对象指定的是同一内存地址,从打印结果就可以看的出来,要解决这个问题就要采用深拷贝进行克隆,在克隆对象时,对于引用类型的字段也要采用克隆的形式,修改后的示例代码:
1
2
3
4
5
6
7
8
9
10
11
12
13
14
15
16
17
18
19
20
21
22
23
24
25
26
27
28
29
30
31
32
33
34
35
36
37
public class ConcretePrototype implements Cloneable private String name; private Person person; public String getName () return name; } public void setName (String name) this .name = name; } public Person getPerson () return person; } public void setPerson (Person person) this .person = person; } @Override protected Object clone () throws CloneNotSupportedException ConcretePrototype concretePrototype = new ConcretePrototype(); concretePrototype.name = this .name; concretePrototype.person = (Person) this .person.clone(); return concretePrototype; } @Override public String toString () return "ConcretePrototype{" + "name='" + name + '\'' + ", person=" + person + '}' ; } }
再次执行,可以发现问题得以解决,原型模式一个很重要的用途就是保护性拷贝,再给其他模块提供接口访问一个不可修改的对象时,为了防止该模块负责人出于某种原因而修改该对象时,就要用原型模式进行保护性拷贝
优点:
看了很多的文章都说原型模式效率搞,下面分别是原型模式和直接new在10000次for循环中创建对象的内存消耗和耗时:
直接new对象,执行耗时为23毫秒,内存占用增加909K,对比图:
原型模式,执行耗时为44毫秒,内存占用增加876K,对比图:
从这些数据来看,原型模式增加了将近一倍的耗时,内存占用并没有少很多,这还是建立在不太准确的测试数据上,个人认为原型模式在效率方面比直接 new 对象并没有提高,不过还有其他的优点在:
原型模式提供了简化的创建结构,工厂方法模式常常需要有一个与产品类等级结构相同的工厂等级结构,而原型模式就不需要这样,原型模式中产品的复制是通过封装在原型类中的克隆方法实现的,无须专门的工厂类来创建产品
可以利用深拷贝实现保护性拷贝,可实现撤销操作
缺点:
想要使用原型模式就要在类中实现克隆方法,修改类的源码,违背了“开闭原则”
深拷贝是需要编写大量的代码,多层对象嵌套时,每层对象都要支持深拷贝


评论