《Android 开发艺术探索》- 第三章内容总结

View

基础

TouchSlop

系统所能识别的最小滑动距离,ViewConfiguration#getScaledTouchSlop() 可以获取到该值,frameworks/base/core/res/res/values/config.xml 中的 config_viewConfigurationTouchSlop 对应的就是该值

VelocityTracker

速度追踪,用于追踪手机横向竖向滑动的速度

GestureDetector

手势识别

Scroller

弹性滑动对象,实现 View 的弹性滑动

滑动

  • scrollTo/scrollBy
  • 动画
  • 改变布局参数

事件传递

boolean dispatchTouchEvent (MotionEvent ev)
如果事件传递到当前的 View,该方法一定会调用,返回值受到当前 View 的 onTouchEvent() 和子 View 的 dispatchTouchEvent() 的影响,表示是否消耗当前事件

boolean onInterceptTouchEvent (MotionEvent ev)
dispatchTouchEvent() 中调用该函数,表示是否拦截当前事件,如果当前 ViewGroup 拦截了该事件,那么同一事件序列中,不会再调用该函数

boolean onTouchEvent (MotionEvent ev)
dispatchTouchEvent() 中调用该函数,表示是否消费当前事件,默认为 true,返回 true 表示消耗,false 表示消耗。如果不消耗,该 View 将不会接受同一事件序列中任何事件

1
2
3
4
5
6
7
8
9
public boolean dispatchTouchEvent(MotionEvent event){
boolean consume = false;
if (onInterceptTouchEvent(event)){
consume = onTouchEvent(event);
} else {
consume = child.dispatchTouchEvent(event);
}
return consume;
}

  • 如果 View 设置了 onTouchEventListener(),只有 onTouchEventListener() 的返回值是 false 才执行 view 的 onTouchEvent(), onTouchEventListener() 的优先级比 onTouchEvent() 优先级要高,onClickListener() 优先级最低
  • ViewGroup 的 onInterceptTouchEvent() 方法任何事件返回 true 拦截之后,同一事件序列中后续的事件将都交给该 ViewGroup 处理,且不会调用 onInterceptTouchEvent()。这个行为很好理解,因为已经拦截了该事件,所以后续事件自然就不会再调用该函数询问是否拦截
  • 同一事件序列中,如果 View 不消耗 ACTION_DOWN 事件,那么该事件序列中其他事件都将不会交给该 View 处理。这个行为可以这样理解:领导想让你做点前端的工作,如果你说你不感兴趣,那么如果再有前端的工作,肯定不会再找你
  • 如果 onTouchEvent() 只消耗了 ACTION_DOWN 事件,那么其他事件不会上传到父 View 的 onTouchEvent() 中,并且该 View 还会接收到其余事件。最终这些事件都会由 Activity 处理
  • ViewGroup 默认不拦截任何事件,源码中 ViewGroup 的 onInterceptTouchEvent() 默认返回 false
  • View 没有 onInterceptTouchEvent() 函数,所以事件传递到 View 直接就调用 onTouchEvent()
  • View 的 onTouchEvent() 函数默认消耗事件,除非该 View 是不可点击的
  • View 的 enable 和 disable 属性不影响 onTouchEvent() 的返回值,只要该 View 的 clickable 或者 longClickable 有一个为 true,那么 onTouchEvent() 的返回值就为 true
  • View 的 clickable 和 longClickable 都为 false 时,onTouchEvent() 返回 false,dispatchTouchEvent() 也返回 false,View 就不会再接收后续的事件
  • onClick() 发生的前提是 View 可点击,并且收到了 ACTION_DOWN 和 ACTION_UP 两个事件
  • 事件的传递总是由外向内的,所有事件都会先传递给父元素,由父元素分发给子元素。在子元素里面可以调用 requestDisallowInterceptTouchEvent() 干预父元素的分发,调用该函数可以阻止父元素使用onInterceptTouchEvent() 函数拦截事件,但是 ACTION_DOWN 除外

源码分析

一个事件首先会传递的 Activity#dispatchKeyEvent 中,内部调用 Window#superDispatchKeyEvent 进行事件分发,而 Window 是抽象类,而且只有一个实现类 PhoneWindow,此时就会执行 PhoneWindow#superDispatchKeyEvent 进行事件的分发,在 PhoneWindow#superDispatchKeyEvent 中调用了 DecorView#superDispatchTouchEvent,而 DecorView#superDispatchTouchEvent 又调用了 super.dispatchTouchEvent,由于DecorView 继承了 FrameLayout,所以这个时候执行的是 ViewGroup#dispatchTouchEvent

其中 DecorView 是当前 Activity 的底层容器,也就是 setContentView 所设置 View 的父容器,可以通过 Activity.getWindow().getDecorView() 获取,通过 DecorView.findViewById(R.id.content).getChildAt(0) 可以获取当前 Activity 通过 setContentView 所设置的那个 View 对象

ViewGroup#dispatchTouchEvent 开始,事件已经传递到了通过 setContentView 所设置的那个 View 对象的 dispatchTouchEvent() 中

ViewGroup

1
2
3
4
5
6
7
8
9
10
11
12
13
14
15
16
17
18
19
20
21
22
23
24
25
26
27
28
29
30
31
32
// Handle an initial down.
// 这里的代码就解析了为什么子 View 调用 requestDisallowInterceptTouchEvent 后对 ACTION_DOWN 不生效
// 因为如果是 ACTION_DOWN 的话,会重新复制 mGroupFlags
if (actionMasked == MotionEvent.ACTION_DOWN) {
// Throw away all previous state when starting a new touch gesture.
// The framework may have dropped the up or cancel event for the previous gesture
// due to an app switch, ANR, or some other state change.
cancelAndClearTouchTargets(ev);
resetTouchState();
}
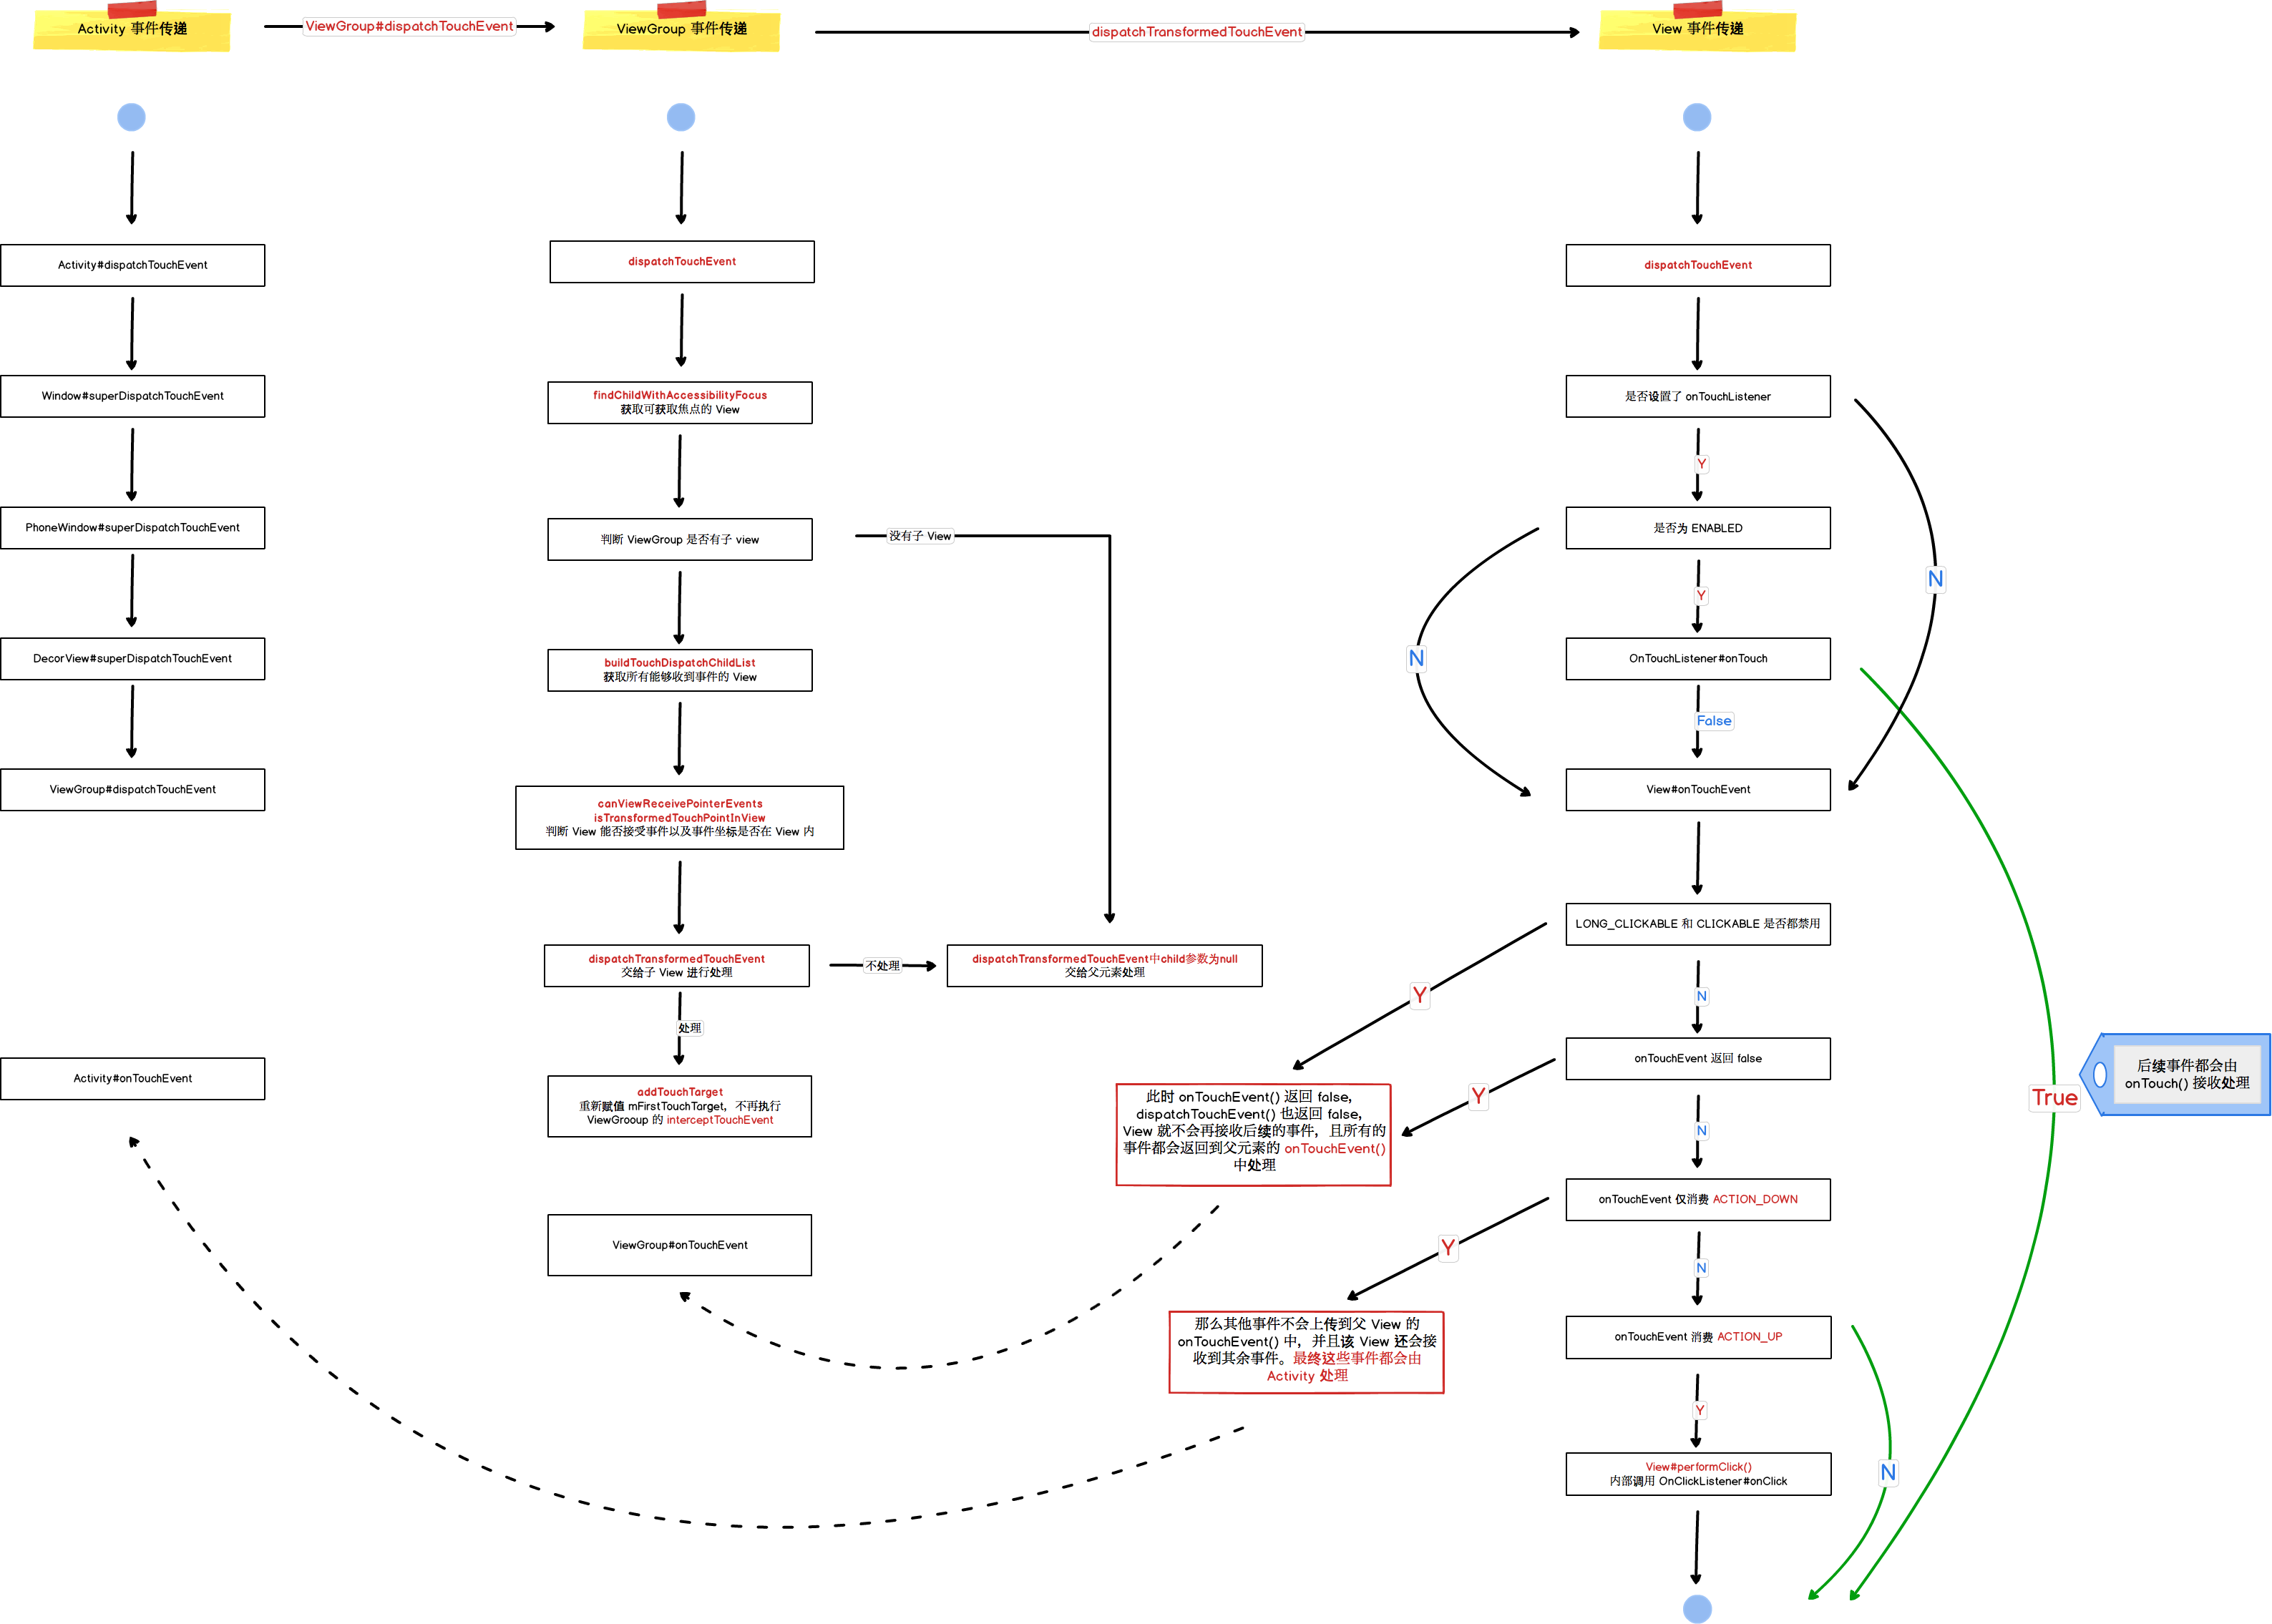
// Check for interception.
final boolean intercepted;
// 如果 action 为 ACTION_DOWN 或者 mFirstTouchTarget 不为空的时候调用 ViewGroup#onInterceptTouchEvent
// 当 ViewGroup 的子 View 消费了事件,那么就把该 View 赋值给 mFirstTouchTarget
// 如果是 ViewGroup 消费了事件,mFirstTouchTarget 则不会被赋值
// 所以当 ViewGroup 的 onInterceptTouchEvent 返回值为 true 时,后续事件就不会再调用 onInterceptTouchEvent
if (actionMasked == MotionEvent.ACTION_DOWN
|| mFirstTouchTarget != null) {
// 这里的 mGroupFlags 就是被子 View 调用 requestDisallowInterceptTouchEvent 设置的
final boolean disallowIntercept = (mGroupFlags & FLAG_DISALLOW_INTERCEPT) != 0;
if (!disallowIntercept) {
intercepted = onInterceptTouchEvent(ev);
ev.setAction(action); // restore action in case it was changed
} else {
intercepted = false;
}
} else {
// There are no touch targets and this action is not an initial down
// so this view group continues to intercept touches.
intercepted = true;
}

1
2
3
4
5
6
7
8
9
10
11
12
13
14
15
16
17
18
19
20
21
22
23
24
25
26
27
28
29
30
31
32
33
34
35
36
37
38
39
40
41
42
43
44
45
46
47
48
49
50
51
52
53
54
55
56
57
58
59
60
61
62
63
64
65
66
67
68
69
70
71
72
73
74
75
76
77
78
79
80
81
82
83
84
85
86
87
88
89
90
91
92
93
94
95
96
97
98
99
100
101
102
 // 找到获取焦点的 View
View childWithAccessibilityFocus = ev.isTargetAccessibilityFocus()
? findChildWithAccessibilityFocus() : null;

// 处理事件
if (actionMasked == MotionEvent.ACTION_DOWN
|| (split && actionMasked == MotionEvent.ACTION_POINTER_DOWN)
|| actionMasked == MotionEvent.ACTION_HOVER_MOVE) {
final int actionIndex = ev.getActionIndex(); // always 0 for down
final int idBitsToAssign = split ? 1 << ev.getPointerId(actionIndex)
: TouchTarget.ALL_POINTER_IDS;

// Clean up earlier touch targets for this pointer id in case they
// have become out of sync.
// 移除上一个消费事件的 View
removePointersFromTouchTargets(idBitsToAssign);
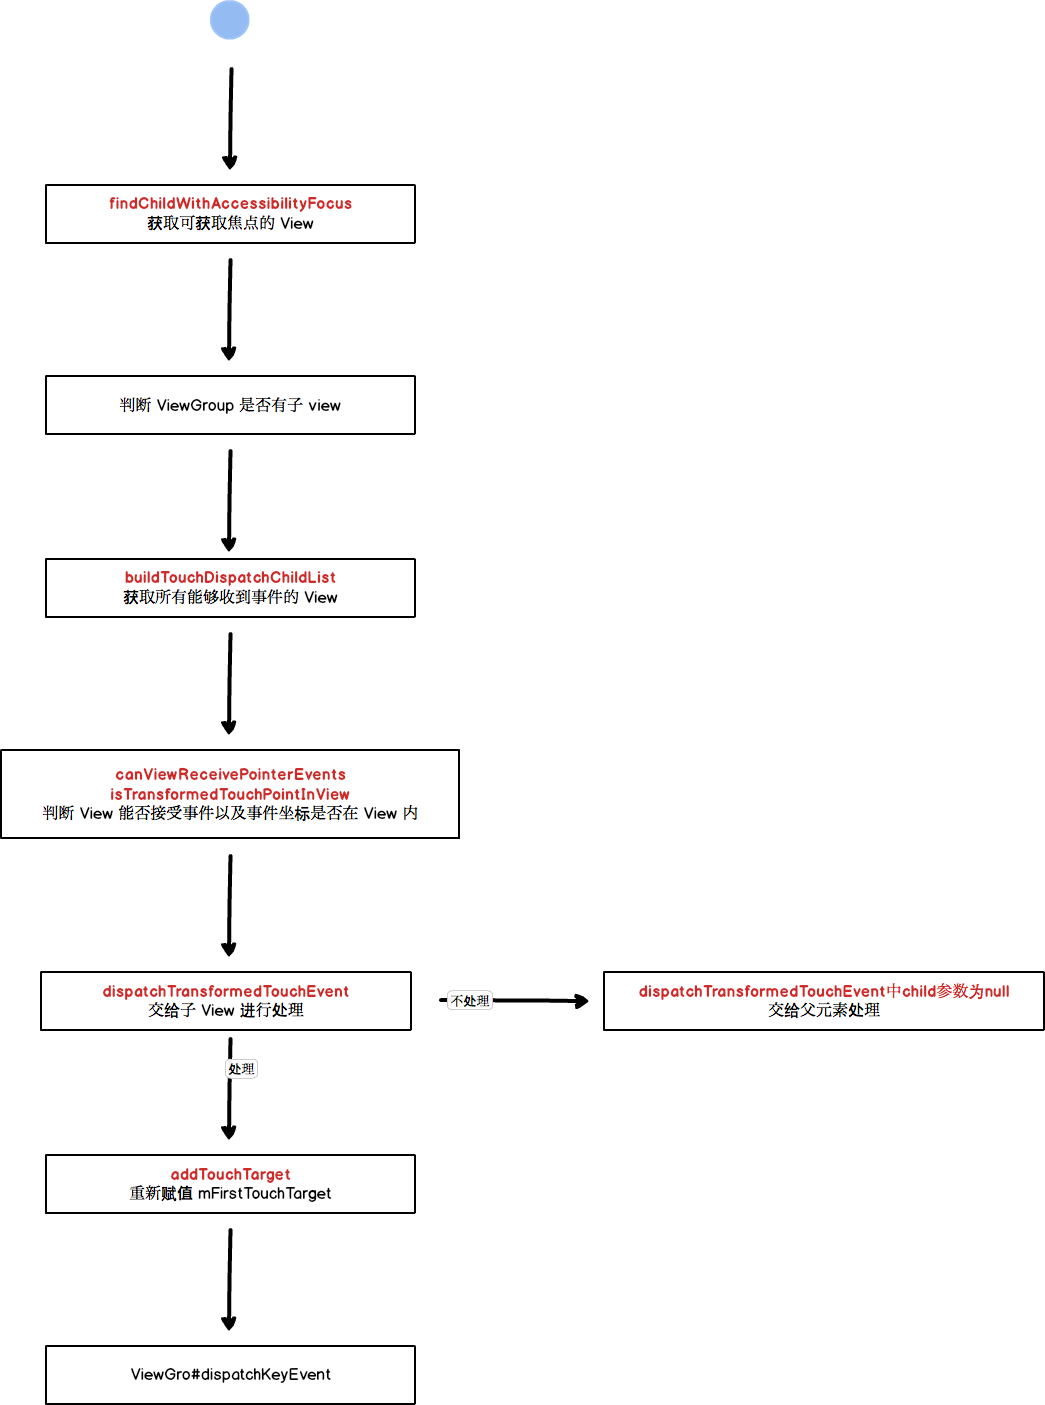
final int childrenCount = mChildrenCount;
if (newTouchTarget == null && childrenCount != 0) {
final float x = ev.getX(actionIndex);
final float y = ev.getY(actionIndex);
// Find a child that can receive the event.
// Scan children from front to back.
// 获取能收到事件的子 View
final ArrayList<View> preorderedList = buildTouchDispatchChildList();
final boolean customOrder = preorderedList == null
&& isChildrenDrawingOrderEnabled();
final View[] children = mChildren;
for (int i = childrenCount - 1; i >= 0; i--) {
final int childIndex = getAndVerifyPreorderedIndex(
childrenCount, i, customOrder);
final View child = getAndVerifyPreorderedView(
preorderedList, children, childIndex);

// If there is a view that has accessibility focus we want it
// to get the event first and if not handled we will perform a
// normal dispatch. We may do a double iteration but this is
// safer given the timeframe.
if (childWithAccessibilityFocus != null) {
if (childWithAccessibilityFocus != child) {
continue;
}
childWithAccessibilityFocus = null;
i = childrenCount - 1;
}

// 判断元素是否可以接受事件以及事件坐标是否在元素内
if (!canViewReceivePointerEvents(child)
|| !isTransformedTouchPointInView(x, y, child, null)) {
ev.setTargetAccessibilityFocus(false);
continue;
}

newTouchTarget = getTouchTarget(child);
if (newTouchTarget != null) {
// Child is already receiving touch within its bounds.
// Give it the new pointer in addition to the ones it is handling.
newTouchTarget.pointerIdBits |= idBitsToAssign;
break;
}

resetCancelNextUpFlag(child);
// 这里就事件交给了子 View 进行处理,否则就继续下个循环
if (dispatchTransformedTouchEvent(ev, false, child, idBitsToAssign)) {
// Child wants to receive touch within its bounds.
mLastTouchDownTime = ev.getDownTime();
if (preorderedList != null) {
// childIndex points into presorted list, find original index
for (int j = 0; j < childrenCount; j++) {
if (children[childIndex] == mChildren[j]) {
mLastTouchDownIndex = j;
break;
}
}
} else {
mLastTouchDownIndex = childIndex;
}
mLastTouchDownX = ev.getX();
mLastTouchDownY = ev.getY();
// 如果子 View 的 dispatchTouchEvent 返回了 true,就在 addTouchTarget 中重新设置 mFirstTouchTarget 的值
newTouchTarget = addTouchTarget(child, idBitsToAssign);
alreadyDispatchedToNewTouchTarget = true;
break;
}

// The accessibility focus didn't handle the event, so clear
// the flag and do a normal dispatch to all children.
ev.setTargetAccessibilityFocus(false);
}
if (preorderedList != null) preorderedList.clear();
}

if (newTouchTarget == null && mFirstTouchTarget != null) {
// Did not find a child to receive the event.
// Assign the pointer to the least recently added target.
newTouchTarget = mFirstTouchTarget;
while (newTouchTarget.next != null) {
newTouchTarget = newTouchTarget.next;
}
newTouchTarget.pointerIdBits |= idBitsToAssign;
}
}

View#dispatchTouchEvent

1
2
3
4
5
6
7
8
9
10
11
12
13
14
15
16
17
if (onFilterTouchEventForSecurity(event)) {
if ((mViewFlags & ENABLED_MASK) == ENABLED && handleScrollBarDragging(event)) {
result = true;
}
//noinspection SimplifiableIfStatement
// 如果设置了 onToucheListener,并且 onTouch 返回了 true,就不会调用 onTouchEvent
ListenerInfo li = mListenerInfo;
if (li != null && li.mOnTouchListener != null
&& (mViewFlags & ENABLED_MASK) == ENABLED
&& li.mOnTouchListener.onTouch(this, event)) {
result = true;
}

if (!result && onTouchEvent(event)) {
result = true;
}
}

View#onTouchEvent

1
2
3
4
5
6
7
8
9
10
11
12
13
14
15
final boolean clickable = ((viewFlags & CLICKABLE) == CLICKABLE
|| (viewFlags & LONG_CLICKABLE) == LONG_CLICKABLE)
|| (viewFlags & CONTEXT_CLICKABLE) == CONTEXT_CLICKABLE;

if ((viewFlags & ENABLED_MASK) == DISABLED) {
if (action == MotionEvent.ACTION_UP && (mPrivateFlags & PFLAG_PRESSED) != 0) {
setPressed(false);
}
mPrivateFlags3 &= ~PFLAG3_FINGER_DOWN;
// A disabled view that is clickable still consumes the touch
// events, it just doesn't respond to them.
// 禁用状态下的 View,依然会消费事件,但是不会做出响应
// 如果 CLICKABLE 和 LONG_CLICKABLE 有一个为 true,onTouchEvent 的返回值就是 true
return clickable;
}

1
2
3
4
5
6
7
8
9
10
11
12
13
if (!focusTaken) {
// Use a Runnable and post this rather than calling
// performClick directly. This lets other visual state
// of the view update before click actions start.
// 创建一个 Runnable 放入到消息池中,如果添加失败就直接执行 performClick()
// performClick() 内部会调用 onClickListener.onClick()
if (mPerformClick == null) {
mPerformClick = new PerformClick();
}
if (!post(mPerformClick)) {
performClick();
}
}
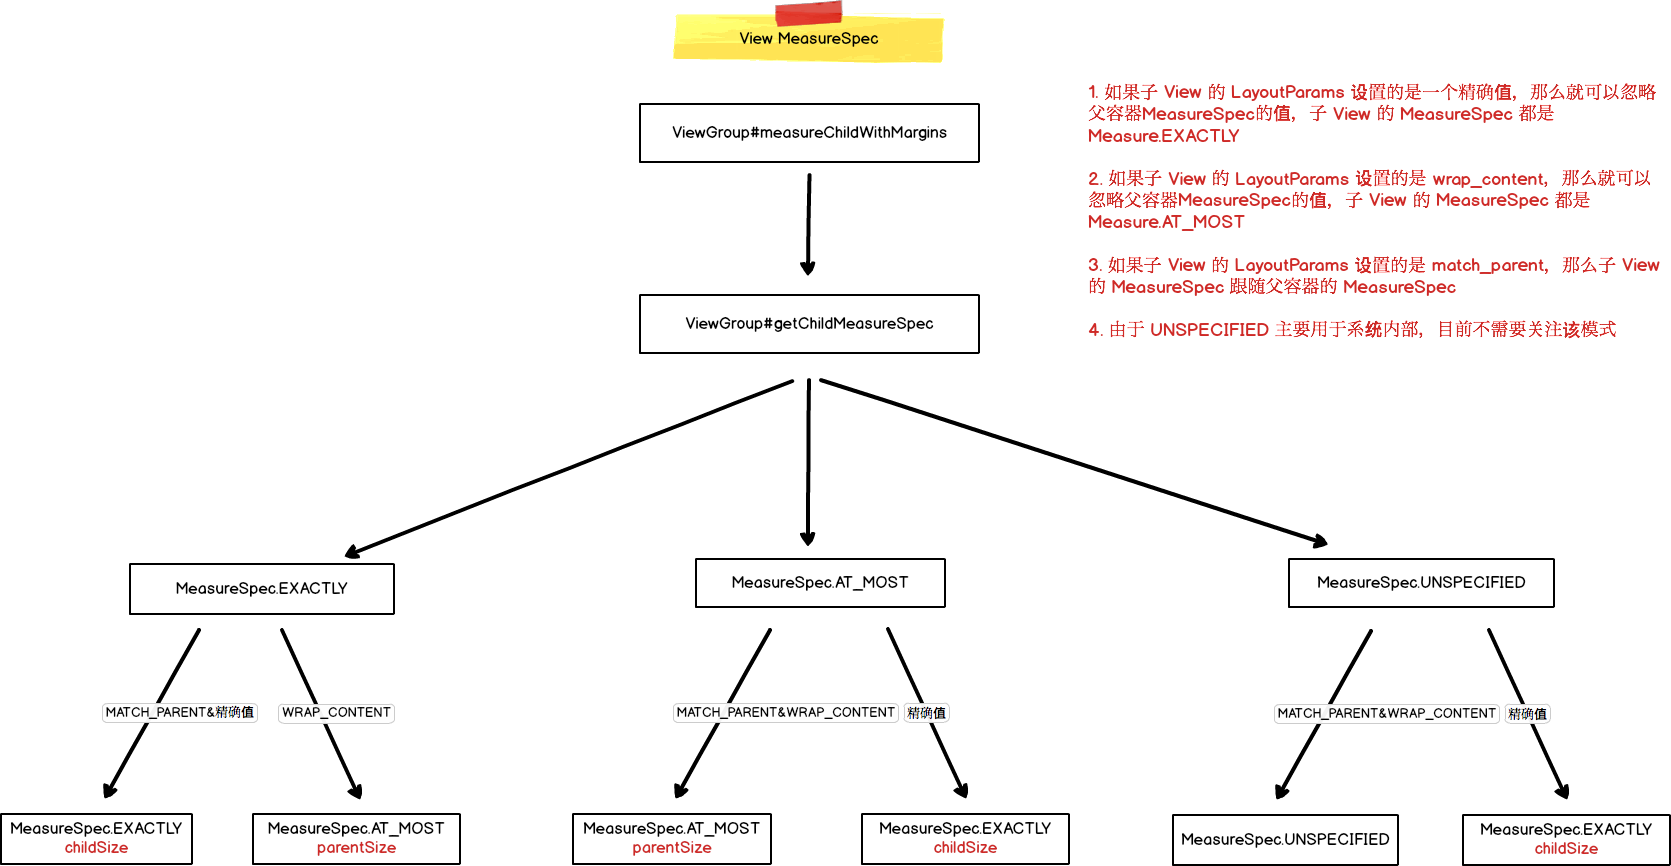
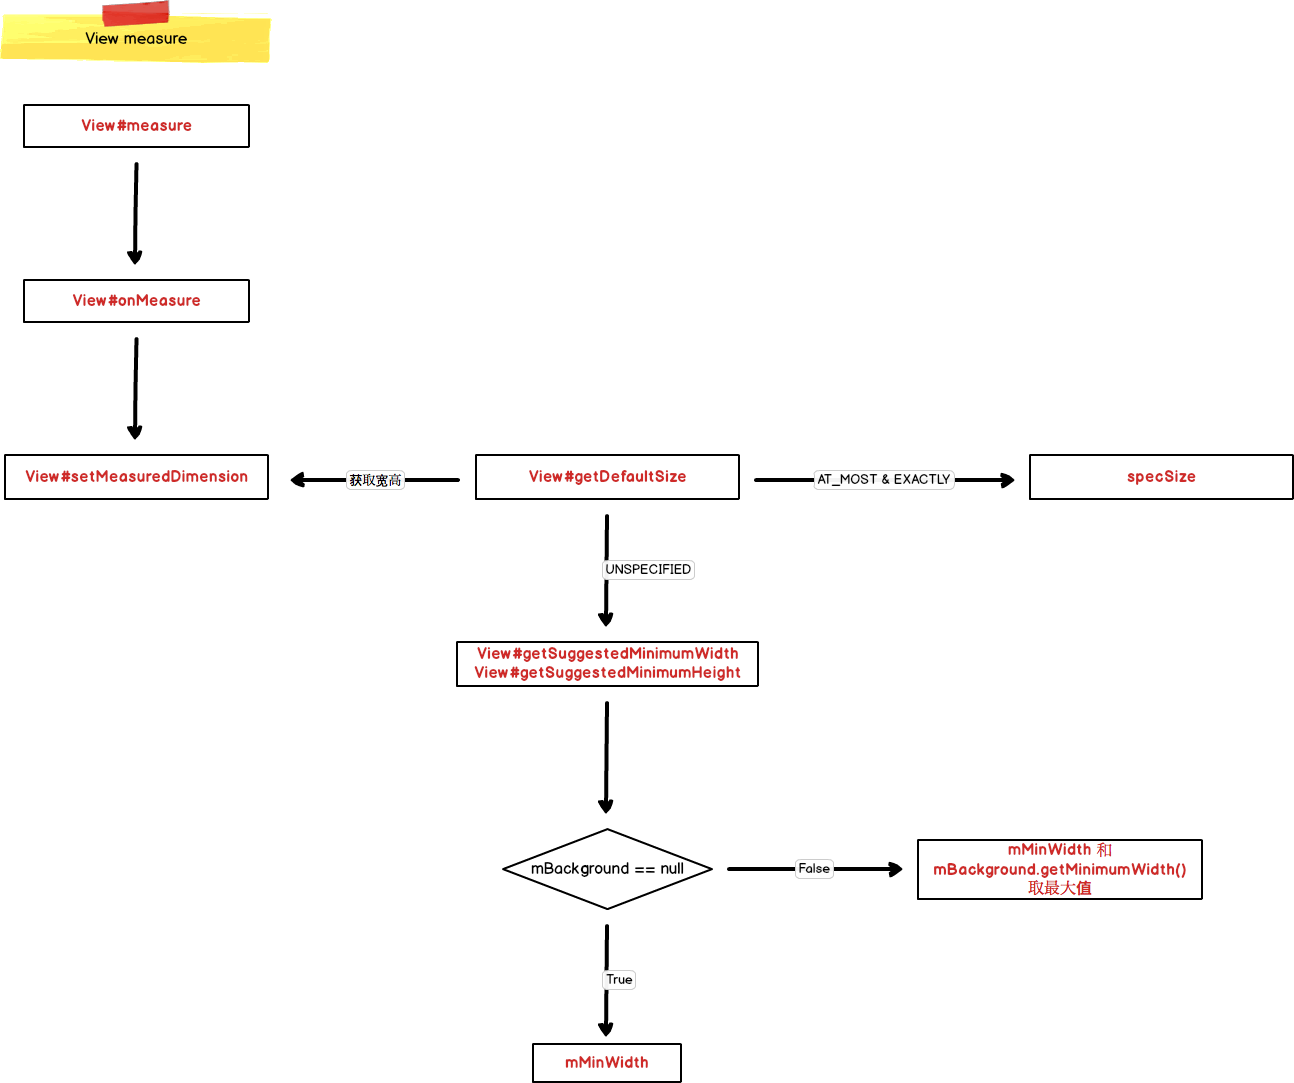
滑动冲突

滑动冲突需要根据实际的业务需求以及不同的场景进行针对性解决,没有一套标准的解决方案,列举一下常见的解决方案。

外部拦截

所有事件都会先交给外部元素,然后根据实际的业务判断是由外部元素处理还是交给内部元素处理

1
2
3
4
5
6
7
8
9
10
11
12
13
14
15
16
17
18
19
20
21
22
23
24
@Override
public boolean onInterceptTouchEvent(MotionEvent ev) {
Log.d(TAG, "onInterceptTouchEvent");
// 此处根据业务以及场景判断是否需要拦截事件
boolean needIntercept = true;
boolean intercept = false;
switch (ev.getAction()) {
case MotionEvent.ACTION_DOWN:
// 因为如果 ACTION_DOWN 事件拦截之后,同一事件序列中的其他事件只会交给该 ViewGroup 处理,这里只能返回 false
intercept = false;
break;
case MotionEvent.ACTION_UP:
// 这里必须要返回 false,因为ViewGroup 只要拦截了任何事件,剩下的事件也只会交给他处理
// 如果在没有拦截 ACTION_MOVE 的情况下,返回了 true,子 View 的 click 事件将不会执行
intercept = false;
break;
case MotionEvent.ACTION_MOVE:
intercept = needIntercept;
break;
default:
break;
}
return intercept;
}

内部拦截

外部元素默认拦截除了 ACTION_DOWN 外的所有事件,由内部元素调用requestDisallowInterceptTouchEvent 来控制外部元素是否拦截事件

1
2
3
4
5
6
7
8
9
10
11
12
13
14
15
16
17
18
19
20
21
22
@Override
public boolean dispatchTouchEvent(MotionEvent ev) {
Log.d(TAG, "dispatchTouchEvent");
// 此处根据业务以及场景判断外部元素是否要拦截事件
boolean parentNeedIntercept = true;
switch (ev.getAction()) {
case MotionEvent.ACTION_DOWN:
// 不允许父元素拦截 ACTION_DOWN
this.requestDisallowInterceptTouchEvent(true);
break;
case MotionEvent.ACTION_UP:
// ACTION_UP 事件不用处理,系统会自动交给拦截 ACTION_MOVE 事件的元素处理
break;
case MotionEvent.ACTION_MOVE:
// 不允许父元素拦截 ACTION_MOVE
this.requestDisallowInterceptTouchEvent(parentNeedIntercept);
break;
default:
break;
}
return super.dispatchTouchEvent(ev);
}

MeasureSpec

ViewRoot 对应 ViewRootImpl 类,是连接 WindowManager 和 DecorView,View 的三大流程都由 ViewRoot 完成,当 Activity 对象被创建完毕后调用 setContentView() 时,会将 DecorView 添加到 Window 中,同时会创建 ViewRootImpl 对象,并将 ViewRootImpl 对象和 DecorView 建立关联

View 的绘制流程从 ViewRoot 的 performTraversals 开始,依次调用 performMeasureperformLayoutperformDraw

调用 performMeasure 时会调用 measuremeasure 中又会调用 onMeasure,如果有子 View 存在,在 onMeasure 中会遍历子 View 并调用其 measure,这就完成了一次 Measure 过程,Layout 和 Draw 过程和 Measure 类似,没有本质上的区别

MeasureSpec 很大程度上决定 View 的测量过程,之所以是很大程度上影响是因为这个过程还受到父容器的影响,在测量过程中,View 的 LayoutParams 以及父容器所施加的规则决定了 MeasureSpec,利用 MeasureSpec 测量出 View 的宽高

对于顶级 DecorView,其 MeasureSpec 由手机屏幕大小和自身的 LayoutParams 决定,其他的 View 都是由父容器的 MeasureSpec 和自身的 LayoutParams 决定

MeasureSpec 代表一个32位的 int 值,高2位代表 SpecMode,低30位代表 SpecSize,SpecMode 代表测量模式,SpecSize 代表某种测量模式下的规格大小

SpecMode 有三类:

  • UNSPECIFIED:未指定模式,一般用于系统内部,表示一种测量状态
  • EXACTLY:精确模式,对于 match_parent 和具体的宽高数值
  • AT_MOST:最大模式,父容器指定一个可用大小,View 的大小不能大于这个值,具体值要看不同 View 的具体实现,对应 wrap_content

查看源码可知,子 View 的 MeasureSpec 受到父容器的 MeasureSpec 和自身的 LayoutParams 影响:

1
2
3
4
5
6
7
8
9
10
11
12
13
14
15
16
17
18
19
20
21
22
23
24
25
26
27
28
29
30
31
32
33
34
35
36
37
38
39
40
41
42
43
44
45
46
47
48
49
50
51
52
53
54
55
56
57
58
59
60
61
62
63
64
65
66
67
68
public static int getChildMeasureSpec(int spec, int padding, int childDimension) {
int specMode = MeasureSpec.getMode(spec);
int specSize = MeasureSpec.getSize(spec);

int size = Math.max(0, specSize - padding);

int resultSize = 0;
int resultMode = 0;

switch (specMode) {
// Parent has imposed an exact size on us
case MeasureSpec.EXACTLY:
if (childDimension >= 0) {
resultSize = childDimension;
resultMode = MeasureSpec.EXACTLY;
} else if (childDimension == LayoutParams.MATCH_PARENT) {
// Child wants to be our size. So be it.
resultSize = size;
resultMode = MeasureSpec.EXACTLY;
} else if (childDimension == LayoutParams.WRAP_CONTENT) {
// Child wants to determine its own size. It can't be
// bigger than us.
resultSize = size;
resultMode = MeasureSpec.AT_MOST;
}
break;

// Parent has imposed a maximum size on us
case MeasureSpec.AT_MOST:
if (childDimension >= 0) {
// Child wants a specific size... so be it
resultSize = childDimension;
resultMode = MeasureSpec.EXACTLY;
} else if (childDimension == LayoutParams.MATCH_PARENT) {
// Child wants to be our size, but our size is not fixed.
// Constrain child to not be bigger than us.
resultSize = size;
resultMode = MeasureSpec.AT_MOST;
} else if (childDimension == LayoutParams.WRAP_CONTENT) {
// Child wants to determine its own size. It can't be
// bigger than us.
resultSize = size;
resultMode = MeasureSpec.AT_MOST;
}
break;

// Parent asked to see how big we want to be
case MeasureSpec.UNSPECIFIED:
if (childDimension >= 0) {
// Child wants a specific size... let him have it
resultSize = childDimension;
resultMode = MeasureSpec.EXACTLY;
} else if (childDimension == LayoutParams.MATCH_PARENT) {
// Child wants to be our size... find out how big it should
// be
resultSize = View.sUseZeroUnspecifiedMeasureSpec ? 0 : size;
resultMode = MeasureSpec.UNSPECIFIED;
} else if (childDimension == LayoutParams.WRAP_CONTENT) {
// Child wants to determine its own size.... find out how
// big it should be
resultSize = View.sUseZeroUnspecifiedMeasureSpec ? 0 : size;
resultMode = MeasureSpec.UNSPECIFIED;
}
break;
}
//noinspection ResourceType
return MeasureSpec.makeMeasureSpec(resultSize, resultMode);
}

measure

下图就是根据源码绘制的 measure 流程:

其实需要注意直接继承 View 的自定义组件,当 MeasureSpec 为 AT_MOST 时,此时该自定义 View 的wrap_content 和 match_parent 的效果其实是一致的。所以需要重写 onMeasure 避免该问题:

1
2
3
4
5
6
7
8
9
10
11
12
13
14
15
@Override
protected void onMeasure(int widthMeasureSpec, int heightMeasureSpec) {
super.onMeasure(widthMeasureSpec, heightMeasureSpec);
int widthMode = MeasureSpec.getMode(widthMeasureSpec);
int widthSize = MeasureSpec.getSize(widthMeasureSpec);
int heightMode = MeasureSpec.getMode(heightMeasureSpec);
int heightSize = MeasureSpec.getSize(heightMeasureSpec);
if (MeasureSpec.AT_MOST == widthMode && MeasureSpec.AT_MOST == heightMode) {
setMeasuredDimension(mWidth, mHeight);
} else if (MeasureSpec.AT_MOST == widthMode) {
setMeasuredDimension(mWidth, heightSize);
} else if (MeasureSpec.AT_MOST == heightMode) {
setMeasuredDimension(widthSize, mHeight);
}
}

测量宽高

View 的测量宽高在某些情况下可能需要系统多次调用 measure 后才能获取,且 measure 的执行和 Activity 的生命周期不是同步执行,所以无法保障在 Activity 的某个生命周期函数中获取 View 的准去测量宽高,下面提供四种获取宽高的方式:

Activity#onWindowFocusChanged

在 Activity 获取(onResume)或失去焦点(onPause)的时候都会调用该函数,此时 Activity 中的 View 已经初始化完毕,可以放心大胆的获取其宽高了

View.post(Runnable)

放一个消息到消息队列中,当执行到该消息的时候,此时 View 已经初始化完成

ViewTreeObserver#onGlobalLayout

使用 ViewTreeObserver,当 View 状态发生改变的时候都会调用 onGlobalLayout 函数,由于 View 的状态可能会改变多次,所以 onGlobalLayout 也会被调用多次

手动 measure

这种方式不是所有的情况下都能使用:

  • match_parent:直接放弃,这种情况下的 measureSpec,需要知道父容器剩余空间大小,此时并不能获取到父容器剩余空间大小

  • warp_content:

    1
    2
    3
    4
    // View 的尺寸用30位的二进制表示,最大化模式下,使用 View 的最大值 (1 << 30) - 1 构建 measureSpec
    int width = View.MeasureSpec.makeMeasureSpec((1 << 30) - 1, View.MeasureSpec.AT_MOST);
    int height = View.MeasureSpec.makeMeasureSpec((1 << 30) - 1, View.MeasureSpec.AT_MOST);
    mView.measure(width, height);

  • 具体数值:

    1
    2
    3
    4
    // 100 为具体数值
    int width = View.MeasureSpec.makeMeasureSpec(100, View.MeasureSpec.EXACTLY);
    int height = View.MeasureSpec.makeMeasureSpec(100,View.MeasureSpec.EXACTLY);
    mView.measure(width, height);

    layout

    相对于 measure,layout 流程就简单多了,首先使用 setFrame 来设置 View 四个顶点的位置,顶点一旦确定,View 的位置也就确定了。接着就会调用 onLayout 确定子 View 的位置,和 onMeasure 类似,onLayout 的具体实现和具体的 View 有关

draw

通过 View#draw 的源码,可以很清晰的看出来 draw 的绘制流程:

  • drawBackground:绘制背景
  • onDraw:绘制内容
  • dispatchDraw:绘制子 View
  • onDrawForeground:绘制前景,包括 onDrawScrollIndicatorsonDrawScrollBars

View#setWillNotDraw 函数表示如果一个 View 自身不处理 onDraw,就可以设置这个标识为 true,系统如果发现这个标识为 true,系统会进行相应的优化。View 默认没有开启,ViewGroup 默认开启。在开发过程中,如果自定义的 ViewGroup 并没有处理 onDraw 就可以开启这个标识,反之则需要显示的关闭该标识

LinearLayout 和 RelativeLayout 性能对比

首先看一下 LinearLayout#onMeasure

1
2
3
4
5
6
7
8
9
10
11
12
13
14
15
16
17
18
19
20
21
22
23
24
25
26
27
28
29
30
31
32
33
34
35
36
37
38
39
40
41
42
43
44
45
46
47
48
49
50
51
52
53
54
55
56
57
58
59
60
61
62
63
64
65
66
67
68
69
70
71
72
73
74
75
76
77
@Override
protected void onMeasure(int widthMeasureSpec, int heightMeasureSpec) {
if (mOrientation == VERTICAL) {
measureVertical(widthMeasureSpec, heightMeasureSpec);
} else {
measureHorizontal(widthMeasureSpec, heightMeasureSpec);
}

View[] views = mSortedHorizontalChildren;
int count = views.length;

for (int i = 0; i < count; i++) {
View child = views[i];
if (child.getVisibility() != GONE) {
LayoutParams params = (LayoutParams) child.getLayoutParams();
int[] rules = params.getRules(layoutDirection);

applyHorizontalSizeRules(params, myWidth, rules);
measureChildHorizontal(child, params, myWidth, myHeight);

if (positionChildHorizontal(child, params, myWidth, isWrapContentWidth)) {
offsetHorizontalAxis = true;
}
}
}

views = mSortedVerticalChildren;
count = views.length;
final int targetSdkVersion = getContext().getApplicationInfo().targetSdkVersion;

for (int i = 0; i < count; i++) {
final View child = views[i];
if (child.getVisibility() != GONE) {
final LayoutParams params = (LayoutParams) child.getLayoutParams();

applyVerticalSizeRules(params, myHeight, child.getBaseline());
measureChild(child, params, myWidth, myHeight);
if (positionChildVertical(child, params, myHeight, isWrapContentHeight)) {
offsetVerticalAxis = true;
}

if (isWrapContentWidth) {
if (isLayoutRtl()) {
if (targetSdkVersion < Build.VERSION_CODES.KITKAT) {
width = Math.max(width, myWidth - params.mLeft);
} else {
width = Math.max(width, myWidth - params.mLeft + params.leftMargin);
}
} else {
if (targetSdkVersion < Build.VERSION_CODES.KITKAT) {
width = Math.max(width, params.mRight);
} else {
width = Math.max(width, params.mRight + params.rightMargin);
}
}
}

if (isWrapContentHeight) {
if (targetSdkVersion < Build.VERSION_CODES.KITKAT) {
height = Math.max(height, params.mBottom);
} else {
height = Math.max(height, params.mBottom + params.bottomMargin);
}
}

if (child != ignore || verticalGravity) {
left = Math.min(left, params.mLeft - params.leftMargin);
top = Math.min(top, params.mTop - params.topMargin);
}

if (child != ignore || horizontalGravity) {
right = Math.max(right, params.mRight + params.rightMargin);
bottom = Math.max(bottom, params.mBottom + params.bottomMargin);
}
}
}
}

再来看一下 RelativeLayout#onMeasure

1
2
3
4
5
6
7
8
9
10
11
12
13
14
15
16
17
18
19
20
21
22
23
24
25
26
27
28
29
30
31
32
33
34
35
36
37
38
39
40
41
42
43
44
45
46
47
48
49
50
51
52
53
54
55
56
57
58
59
60
61
62
63
64
65
66
67
68
69
70
71
72
73
74
75
76
77
78
79
80
81
82
83
84
85
86
87
88
89
90
91
92
93
94
95
96
97
98
99
100
101
protected void onMeasure(int widthMeasureSpec, int heightMeasureSpec) {
...
View[] views = mSortedHorizontalChildren;
int count = views.length;

for (int i = 0; i < count; i++) {
View child = views[i];
if (child.getVisibility() != GONE) {
LayoutParams params = (LayoutParams) child.getLayoutParams();
int[] rules = params.getRules(layoutDirection);

applyHorizontalSizeRules(params, myWidth, rules);
measureChildHorizontal(child, params, myWidth, myHeight);

if (positionChildHorizontal(child, params, myWidth, isWrapContentWidth)) {
offsetHorizontalAxis = true;
}
}
}

views = mSortedVerticalChildren;
count = views.length;
final int targetSdkVersion = getContext().getApplicationInfo().targetSdkVersion;

for (int i = 0; i < count; i++) {
final View child = views[i];
if (child.getVisibility() != GONE) {
final LayoutParams params = (LayoutParams) child.getLayoutParams();

applyVerticalSizeRules(params, myHeight, child.getBaseline());
measureChild(child, params, myWidth, myHeight);
if (positionChildVertical(child, params, myHeight, isWrapContentHeight)) {
offsetVerticalAxis = true;
}

if (isWrapContentWidth) {
if (isLayoutRtl()) {
if (targetSdkVersion < Build.VERSION_CODES.KITKAT) {
width = Math.max(width, myWidth - params.mLeft);
} else {
width = Math.max(width, myWidth - params.mLeft + params.leftMargin);
}
} else {
if (targetSdkVersion < Build.VERSION_CODES.KITKAT) {
width = Math.max(width, params.mRight);
} else {
width = Math.max(width, params.mRight + params.rightMargin);
}
}
}

if (isWrapContentHeight) {
if (targetSdkVersion < Build.VERSION_CODES.KITKAT) {
height = Math.max(height, params.mBottom);
} else {
height = Math.max(height, params.mBottom + params.bottomMargin);
}
}

if (child != ignore || verticalGravity) {
left = Math.min(left, params.mLeft - params.leftMargin);
top = Math.min(top, params.mTop - params.topMargin);
}

if (child != ignore || horizontalGravity) {
right = Math.max(right, params.mRight + params.rightMargin);
bottom = Math.max(bottom, params.mBottom + params.bottomMargin);
}
}
}
...

final boolean useExcessSpace = lp.height == 0 && lp.weight > 0;
if (heightMode == MeasureSpec.EXACTLY && useExcessSpace) {
// 如果是设置了 weight 且 height 是0的时候就跳过测绘,只把 margin 值添加到总高中
final int totalLength = mTotalLength;
mTotalLength = Math.max(totalLength, totalLength + lp.topMargin + lp.bottomMargin);
skippedMeasure = true;
} else {
if (useExcessSpace) {
lp.height = LayoutParams.WRAP_CONTENT;
}
final int usedHeight = totalWeight == 0 ? mTotalLength : 0;
measureChildBeforeLayout(child, i, widthMeasureSpec, 0,
heightMeasureSpec, usedHeight);

final int childHeight = child.getMeasuredHeight();
if (useExcessSpace) {
lp.height = 0;
consumedExcessSpace += childHeight;
}

final int totalLength = mTotalLength;
mTotalLength = Math.max(totalLength, totalLength + childHeight + lp.topMargin +
lp.bottomMargin + getNextLocationOffset(child));

if (useLargestChild) {
largestChildHeight = Math.max(childHeight, largestChildHeight);
}
}
}

可以很明显的看出来 RelativeLayout 进行了两次 onMeasure,原因是因为 RelativeLayout 中的子 View 之间有相互依赖的关系。需要先进行一次横向测量,再进行一次纵向测量才能确定子 View 的位置

LinearLayout 只测量了一次,但是如果设置了 weight,这个时候就会跳过测量这个 View,等剩余所有的 View 都测量完之后,把剩余空间按照 weight 的值分配给对应的 View,这个时候该 View 会测量一次。由此可见 weight 对性能还是有影响的

但是实际开发过程中为了优化布局嵌套和层级深度,很多情况下还是需要使用 RelativeLayout,因为使用 LinearLayout 布局很容易造成太多布局嵌套,在布局层级不深的情况下还是要优先使用 LinearLayout

自定义 View

实现方式

  • 继承 View 重写 onDraw 函数
  • 继承 ViewGroup 自定义特殊的 Layout
  • 继承现有的 View 子类(例如 Button)
  • 继承现有的 ViewGroup 子类(例如 LinearLayout)

注意事项

  • 尽量让自定义 View 支持 wrap_content
  • 尽量让自定义 View 支持 padding 和 margin 属性
  • 尽量不要在自定义 View 内部使用 Handler,因为 View 自身就提供有 post
  • 如果有滑动,考虑到滑动冲突的情况
  • 如果 View 中有线程或者动画,需要及时停止。当 View 所依赖的 Activity 销毁或者该 View 被 Remove 时,View#onDatachedFromWindow 会被调用,此时应当停止 View 中的线程和动画;与该函数对应的函数是 View#onAttachedToWindow,当 View 所在的 Activity 启动的时候会调用该函数

继承 View

首先需要重写 View 的构造函数,根据不同的引用方式会触发不同的构造函数:

1
2
3
4
5
6
7
8
9
10
11
12
13
14
15
16
17
18
19
20
21
22
23
public class CustomView extends View {

/**
* 从代码创建 View 时调用该构造函数
*/
public CustomView(Context context) {
this(context, null);
}

/**
* 在 XML 中引用该 View 时调用该构造函数
*/
public CustomView(Context context, @Nullable AttributeSet attrs) {
this(context, attrs, 0);
}

/**
* 在 XML 中引用该 View,并且有一个 style 样式
*/
public CustomView(Context context, @Nullable AttributeSet attrs, int defStyleAttr) {
super(context, attrs, defStyleAttr);
}
}

接着需要重写 onDraw() 函数画一个圆:

1
2
3
4
5
6
7
8
protected void onDraw(Canvas canvas) {
super.onDraw(canvas);
int width = getWidth();
int height = getHeight();
int radius = Math.min(width, height) / 2;
// 一参是圆心的 X 轴坐标,二参是圆心 Y 轴坐标,三参是圆半径,四参是用来画圆的画笔
canvas.drawCircle(width / 2, height / 2, radius, mPaint);
}

还需要考虑设置了 padding 以及 warp_content 的情况,这个时候就需要重写 onMeasure()onDraw() 函数:

1
2
3
4
5
6
7
8
9
10
11
12
13
14
15
16
17
18
19
20
21
22
23
24
25
26
27
28
29
30
// warp_content 需要重写 onMeasure()
protected void onMeasure(int widthMeasureSpec, int heightMeasureSpec) {
super.onMeasure(widthMeasureSpec, heightMeasureSpec);
int widthMode = MeasureSpec.getMode(widthMeasureSpec);
int widthSize = MeasureSpec.getSize(widthMeasureSpec);
int heightMode = MeasureSpec.getMode(heightMeasureSpec);
int heightSize = MeasureSpec.getSize(heightMeasureSpec);
// mWidth mHeight 为默认值
if (MeasureSpec.AT_MOST == widthMode && MeasureSpec.AT_MOST == heightMode) {
setMeasuredDimension(mWidth, mHeight);
} else if (MeasureSpec.AT_MOST == widthMode) {
setMeasuredDimension(mWidth, heightSize);
} else if (MeasureSpec.AT_MOST == heightMode) {
setMeasuredDimension(widthSize, mHeight);
}
}

// padding 需要重写 onDraw(),在绘制的时候把 padding 去掉即可
protected void onDraw(Canvas canvas) {
super.onDraw(canvas);
int paddingTop = getPaddingTop();
int paddingBottom = getPaddingBottom();
int paddingLeft = getPaddingLeft();
int paddingRight = getPaddingRight();
int width = getWidth() - paddingLeft - paddingRight;
int height = getHeight() - paddingTop - paddingBottom;
int radius = Math.min(width, height) / 2;
// 一参是圆心的 X 轴坐标,二参是圆心 Y 轴坐标,三参是圆半径,四参是用来画圆的画笔
canvas.drawCircle(paddingLeft + width / 2,paddingTop + height / 2, radius, mPaint);
}

也许还需要设置一些自定义的样式属性,这个时候就需要在 values 文件夹中创建一个 attrs.xml 文件(可以是任意文件名)存放声明的样式,下面是 attrs_circle_view.xml

1
2
3
4
5
6
<?xml version="1.0" encoding="utf-8"?>
<resources>
<declare-styleable name="CustomView">
<attr name="circle_color" format="color"/>
</declare-styleable>
</resources>

在 xml 文件中的引用需要声明一个 schemas 声明:xmlns:app="http://schemas.android.com/apk/res-auto"

1
2
3
4
5
6
7
8
9
10
11
12
13
14
15
16
17
18
<?xml version="1.0" encoding="utf-8"?>
<LinearLayout
xmlns:android="http://schemas.android.com/apk/res/android"
xmlns:app="http://schemas.android.com/apk/res-auto"
xmlns:tools="http://schemas.android.com/tools"
android:layout_width="match_parent"
android:layout_height="match_parent"
android:orientation="vertical"
tools:context=".MainActivity">

<org.lovedev.chapter_4.CustomView
android:id="@+id/view"
android:layout_width="100dp"
android:padding="10dp"
app:circle_color="@color/colorPrimary"
android:layout_height="100dp"/>

</LinearLayout>

在自定义 View 中需要引用并解析这个自定义的样式属性:

1
2
3
4
5
6
7
8
9
10
11
12
13
public CustomView(Context context, @Nullable AttributeSet attrs, int defStyleAttr) {
super(context, attrs, defStyleAttr);
TypedArray typedArray = context.obtainStyledAttributes(attrs, R.styleable.CustomView);
// mColor 就是通过 app:circle_color 属性设置的颜色属性,如果没有设置就默认是 Color.RED
mColor = typedArray.getColor(R.styleable.CustomView_circle_color, Color.RED);
typedArray.recycle();
init();
}

private void init() {
mPaint = new Paint();
mPaint.setColor(mColor);
}

布局优化

可以使用 Android Device Monitor 以及 layout inspector 工具查看页面布局,不过 Android Device Monitor 已经从 Andorid Studio 中废弃了,可以查看官方解释

include

该标签可以实现重用布局,比如多个页面相同的头布局,但是这种方式除了位置和布局大小以外,不能做任何改变

merge

setContentView() 时会调用 Window#setContentView(),前面已经说过 PhoneWindowWindow 的唯一实现类,在 PhoneWindow 中能看到这么一行代码:

1
2
// This is the top-level view of the window, containing the window decor.
private DecorView mDecor;

可以发现 DecorViewPhoneWindow 的根 View,而 DecorView 继承了 FrameLayout,到此就能知道为什么布局的最外层是 FrameLayout

先创建两个布局文件,然后 include 到布局当中:

1
2
3
4
5
6
7
8
9
10
11
12
13
14
15
16
17
18
19
20
21
22
23
24
25
26
27
28
29
30
31
32
33
34
35
36
37
38
39
40
41
42
43
44
45
46
47
<!--button.xml-->
<?xml version="1.0" encoding="utf-8"?>
<LinearLayout xmlns:android="http://schemas.android.com/apk/res/android"
android:orientation="vertical"
android:layout_width="match_parent"
android:layout_height="match_parent">

<Button
android:layout_width="match_parent"
android:text="Merge"
android:layout_height="60dp"/>
</LinearLayout>

<!--button_merge.xml-->
<?xml version="1.0" encoding="utf-8"?>
<merge xmlns:android="http://schemas.android.com/apk/res/android"
android:orientation="vertical"
android:layout_width="match_parent"
android:layout_height="match_parent">

<Button
android:layout_width="match_parent"
android:text="With Merge"
android:layout_height="60dp"/>
</merge>

<!--activity.xml-->
<?xml version="1.0" encoding="utf-8"?>
<LinearLayout
xmlns:android="http://schemas.android.com/apk/res/android"
xmlns:app="http://schemas.android.com/apk/res-auto"
xmlns:tools="http://schemas.android.com/tools"
android:layout_width="match_parent"
android:layout_height="match_parent"
android:orientation="vertical"
tools:context=".SecondActivity">

<include
layout="@layout/button"
android:layout_width="match_parent"
android:layout_height="wrap_content"/>

<include
layout="@layout/button_merge"
android:layout_width="match_parent"
android:layout_height="wrap_content"/>
</LinearLayout>

使用 Andorid Studio 自带的 Layout inspector 查看 View Tree:

从 View Tree 中可以很清晰的看出,用了 merge 标签的布局自动把布局中的元素插入到了 include 引用的地方,而没有使用 merge 标签的那个布局还会有一层 LinearLayout 布局

ViewStub

首先需要注意的是 ViewStub 不能应用含有 merge 标签的布局,否则会抛出异常:

android.view.InflateException: can be used only with a valid ViewGroup root and attachToRoot=true

ViewStub 常用的场景是引用那些不常用的布局,比如用户注册的时候,经常会有一些必选项和一些可选项,这些可选项可能需要手动点击某个按钮才能显示出来,如果开始用 GONE 或者 INVISIBLE,然后再用 VISIBLE 显示也能实现这样的功能,但是用这种处理方式时,这个布局初始化的时候已经把所有的元素加载了,这个时候使用 ViewStub 就能优化这点

看一下官网对于 ViewStub 的介绍:

A ViewStub is an invisible, zero-sized View that can be used to lazily inflate layout resources at runtime. When a ViewStub is made visible, or when inflate() is invoked, the layout resource is inflated.

简单翻译:ViewStub 是一个可以用来在运行时懒加载布局且是无形的,0大小的 View,当 ViewStub 是可见的,或者 inflate() 函数被调用,布局就会加载出来。

所以当使用 ViewStub 的时候,就可以调用 ViewStub.setVisibility(View.VISIBLE) 或者 ViewStub.inflate() 就可以显示引用的布局。

RecyclerView & ListView

ListView 缓存分析

查看源码可知 ListView 的缓存逻辑是在其父类 AbsListView 中的一个内部类 RecycleBin实现的:

1
2
3
4
5
6
7
8
9
10
11
12
13
14
15
16
17
18
19
20
21
22
23
24
25
26
27
28
29
30
31
32
 /**
* The RecycleBin facilitates reuse of views across layouts. The RecycleBin has two levels of
* storage: ActiveViews and ScrapViews. ActiveViews are those views which were onscreen at the
* start of a layout. By construction, they are displaying current information. At the end of
* layout, all views in ActiveViews are demoted to ScrapViews. ScrapViews are old views that
* could potentially be used by the adapter to avoid allocating views unnecessarily.
*
* @see android.widget.AbsListView#setRecyclerListener(android.widget.AbsListView.RecyclerListener)
* @see android.widget.AbsListView.RecyclerListener
*/
class RecycleBin {
private RecyclerListener mRecyclerListener;

/**
* The position of the first view stored in mActiveViews.
*/
private int mFirstActivePosition;

/**
* Views that were on screen at the start of layout. This array is populated at the start of
* layout, and at the end of layout all view in mActiveViews are moved to mScrapViews.
* Views in mActiveViews represent a contiguous range of Views, with position of the first
* view store in mFirstActivePosition.
*/
private View[] mActiveViews = new View[0];

/**
* Unsorted views that can be used by the adapter as a convert view.
*/
private ArrayList<View>[] mScrapViews;
...
}

这个类有两个缓存级别:

  • ActiveViews - 一级缓存,布局开始 layout 时显示的 View
  • ScrapViews - 二级缓存,当 layout 结束后 ActiveView 降级为 ScrapView

首次 onLayout

首先分析 ListView 的首次 onLayout,查看源码发现 ListView 中没有 onLayout,但是在父类 AbsListView 中存在:

1
2
3
4
5
6
7
8
9
10
11
12
13
14
15
16
17
18
19
20
21
22
23
24
25
26
27
28
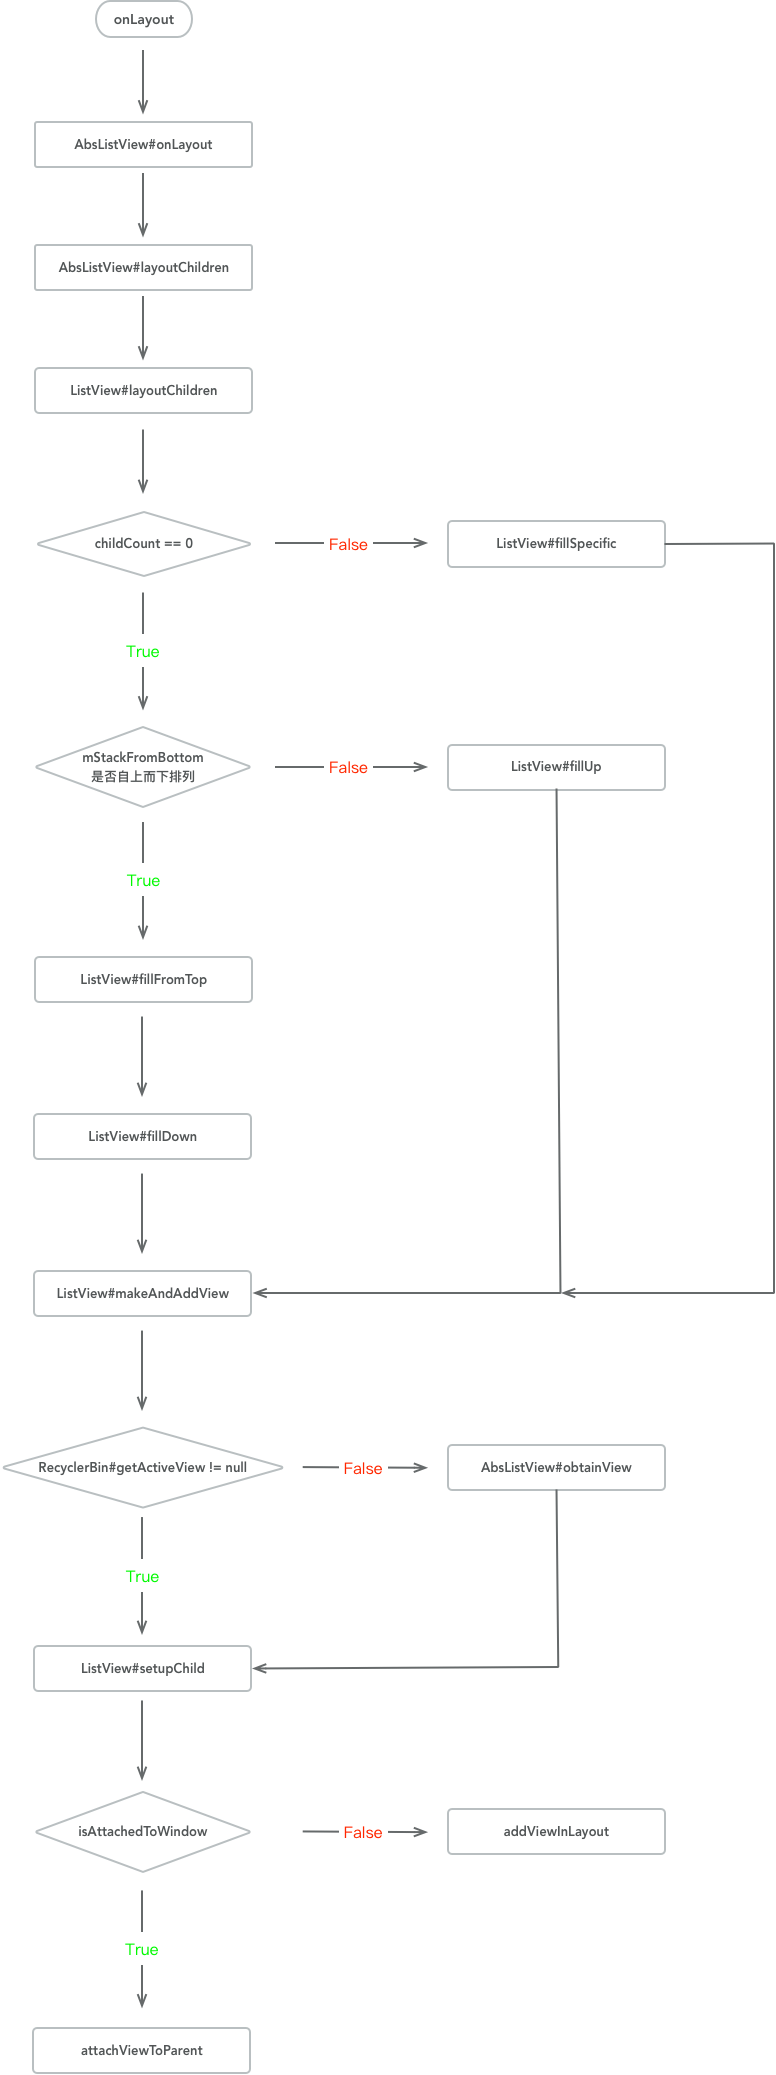
  /**
* Subclasses should NOT override this method but
* {@link #layoutChildren()} instead.
*/
@Override
protected void onLayout(boolean changed, int l, int t, int r, int b) {
super.onLayout(changed, l, t, r, b);

mInLayout = true;

final int childCount = getChildCount();
if (changed) {
for (int i = 0; i < childCount; i++) {
getChildAt(i).forceLayout();
}
mRecycler.markChildrenDirty();
}

layoutChildren();

mOverscrollMax = (b - t) / OVERSCROLL_LIMIT_DIVISOR;

// TODO: Move somewhere sane. This doesn't belong in onLayout().
if (mFastScroll != null) {
mFastScroll.onItemCountChanged(getChildCount(), mItemCount);
}
mInLayout = false;
}

可以看到执行了 layoutChildren 函数,layoutChildren 函数由子类实现,首先看首次 onLayout 时的关键步骤:

1
2
3
4
5
6
7
8
9
10
11
12
13
14
15
16
17
18
19
20
21
22
23
24
25
26
27
28
29
30
31
32
33
34
35
36
37
38
39
40
41
42
43
44
45
46
47
48
49
50
51
52
53
54
55
56
57
58
59
60
61
62
63
64
65
66
67
68
69
70
71
72
73
74
75
76
77
78
79
80
81
82
83
84
85
86
87
protected void layoutChildren() {
...
// 由于数据都在 adapter 中存在,所以首次 layout 的时候还没有数据,dataChanged 肯定是 false,而且此时 childCount 肯定是 0,此时执行 recycleBin#fillActiveViews 没有实际意义
if (dataChanged) {
for (int i = 0; i < childCount; i++) {
recycleBin.addScrapView(getChildAt(i), firstPosition+i);
}
} else {
recycleBin.fillActiveViews(childCount, firstPosition);
}


// Clear out old views
detachAllViewsFromParent();
recycleBin.removeSkippedScrap();

// mLayoutMode 默认值为 LAYOUT_NORMAL,所以代码会执行到 default 中
switch (mLayoutMode) {
case LAYOUT_SET_SELECTION:
if (newSel != null) {
sel = fillFromSelection(newSel.getTop(), childrenTop, childrenBottom);
} else {
sel = fillFromMiddle(childrenTop, childrenBottom);
}
break;
case LAYOUT_SYNC:
sel = fillSpecific(mSyncPosition, mSpecificTop);
break;
case LAYOUT_FORCE_BOTTOM:
sel = fillUp(mItemCount - 1, childrenBottom);
adjustViewsUpOrDown();
break;
case LAYOUT_FORCE_TOP:
mFirstPosition = 0;
sel = fillFromTop(childrenTop);
adjustViewsUpOrDown();
break;
case LAYOUT_SPECIFIC:
final int selectedPosition = reconcileSelectedPosition();
sel = fillSpecific(selectedPosition, mSpecificTop);
/**
* When ListView is resized, FocusSelector requests an async selection for the
* previously focused item to make sure it is still visible. If the item is not
* selectable, it won't regain focus so instead we call FocusSelector
* to directly request focus on the view after it is visible.
*/
if (sel == null && mFocusSelector != null) {
final Runnable focusRunnable = mFocusSelector
.setupFocusIfValid(selectedPosition);
if (focusRunnable != null) {
post(focusRunnable);
}
}
break;
case LAYOUT_MOVE_SELECTION:
sel = moveSelection(oldSel, newSel, delta, childrenTop, childrenBottom);
break;
default:
// 由于没有数据的原因,所以 childCount 也是 0
if (childCount == 0) {
// 由于布局默认的排列顺序是自上而下的,会往下执行 fillFromTop
// 注意传入 fillFromTop 的参数 childrenTop 实际为第一个子元素距离 ListView 的像素值,如果 ListView 没有设置 Padding,该值为 0
if (!mStackFromBottom) {
final int position = lookForSelectablePosition(0, true);
setSelectedPositionInt(position);
sel = fillFromTop(childrenTop);
} else {
final int position = lookForSelectablePosition(mItemCount - 1, false);
setSelectedPositionInt(position);
sel = fillUp(mItemCount - 1, childrenBottom);
}
} else {
if (mSelectedPosition >= 0 && mSelectedPosition < mItemCount) {
sel = fillSpecific(mSelectedPosition,
oldSel == null ? childrenTop : oldSel.getTop());
} else if (mFirstPosition < mItemCount) {
sel = fillSpecific(mFirstPosition,
oldFirst == null ? childrenTop : oldFirst.getTop());
} else {
sel = fillSpecific(0, childrenTop);
}
}
break;
}

...
}

接着分析 fillFromTop 函数:

1
2
3
4
5
6
7
8
private View fillFromTop(int nextTop) {
mFirstPosition = Math.min(mFirstPosition, mSelectedPosition);
mFirstPosition = Math.min(mFirstPosition, mItemCount - 1);
if (mFirstPosition < 0) {
mFirstPosition = 0;
}
return fillDown(mFirstPosition, nextTop);
}

mFirstPosition 进行一番校验后,最终执行了 fillDown

1
2
3
4
5
6
7
8
9
10
11
12
13
14
15
16
17
18
19
20
21
22
23
private View fillDown(int pos, int nextTop) {
View selectedView = null;
// end 为 ListView 的总高度
int end = (mBottom - mTop);
if ((mGroupFlags & CLIP_TO_PADDING_MASK) == CLIP_TO_PADDING_MASK) {
end -= mListPadding.bottom;
}

while (nextTop < end && pos < mItemCount) {
// is this the selected item?
boolean selected = pos == mSelectedPosition;
View child = makeAndAddView(pos, nextTop, true, mListPadding.left, selected);

nextTop = child.getBottom() + mDividerHeight;
if (selected) {
selectedView = child;
}
pos++;
}

setVisibleRangeHint(mFirstPosition, mFirstPosition + getChildCount() - 1);
return selectedView;
}

fillDown 中会有一个 while 循环,end 为 ListView 的总高度,在循环开始时 nextTop 必定小于 endmItemCount 是通过 BaseAdapter#getCount,所以 pos 也是小于 mItemCount,通过执行 makeAndAddView 函数获取当前位置的 View,然后把该 View 距离 ListView 顶部高度与分割线高度和重新赋值给 nextTop,同时将 pos 加上 1 继续下一个循环,此时需要查看一下 makeAndAddView 函数的源码:

1
2
3
4
5
6
7
8
9
10
11
12
13
14
15
16
17
18
19
20
21
22
private View makeAndAddView(int position, int y, boolean flow, int childrenLeft,
boolean selected) {
if (!mDataChanged) {
// Try to use an existing view for this position.
final View activeView = mRecycler.getActiveView(position);
if (activeView != null) {
// Found it. We're reusing an existing child, so it just needs
// to be positioned like a scrap view.
setupChild(activeView, position, y, flow, childrenLeft, selected, true);
return activeView;
}
}

// Make a new view for this position, or convert an unused view if
// possible.
final View child = obtainView(position, mIsScrap);

// This needs to be positioned and measured.
setupChild(child, position, y, flow, childrenLeft, selected, mIsScrap[0]);

return child;
}

由于执行到该函数时,mDataChanged 的值一直为 false,所以会执行 mRecycler.getActiveView 来获取 View 对象,此时获取到的 View 对象肯定是 null;所以还会往下执行,通过 obtainView 获取 View 对象,该函数的实现在 AbsListView 类中:

1
2
3
4
5
6
7
8
9
10
11
12
13
14
15
16
17
18
19
20
21
22
23
24
25
26
27
28
29
30
31
32
33
34
35
36
37
38
39
40
41
42
43
44
45
46
47
48
49
50
51
52
53
54
55
56
57
58
59
60
61
62
63
64
65
66
67
View obtainView(int position, boolean[] outMetadata) {
Trace.traceBegin(Trace.TRACE_TAG_VIEW, "obtainView");

outMetadata[0] = false;

// Check whether we have a transient state view. Attempt to re-bind the
// data and discard the view if we fail.
final View transientView = mRecycler.getTransientStateView(position);
if (transientView != null) {
final LayoutParams params = (LayoutParams) transientView.getLayoutParams();

// If the view type hasn't changed, attempt to re-bind the data.
if (params.viewType == mAdapter.getItemViewType(position)) {
final View updatedView = mAdapter.getView(position, transientView, this);

// If we failed to re-bind the data, scrap the obtained view.
if (updatedView != transientView) {
setItemViewLayoutParams(updatedView, position);
mRecycler.addScrapView(updatedView, position);
}
}

outMetadata[0] = true;

// Finish the temporary detach started in addScrapView().
transientView.dispatchFinishTemporaryDetach();
return transientView;
}

// 特别注意这两行代码
final View scrapView = mRecycler.getScrapView(position);
final View child = mAdapter.getView(position, scrapView, this);
if (scrapView != null) {
if (child != scrapView) {
// Failed to re-bind the data, return scrap to the heap.
mRecycler.addScrapView(scrapView, position);
} else if (child.isTemporarilyDetached()) {
outMetadata[0] = true;

// Finish the temporary detach started in addScrapView().
child.dispatchFinishTemporaryDetach();
}
}

if (mCacheColorHint != 0) {
child.setDrawingCacheBackgroundColor(mCacheColorHint);
}

if (child.getImportantForAccessibility() == IMPORTANT_FOR_ACCESSIBILITY_AUTO) {
child.setImportantForAccessibility(IMPORTANT_FOR_ACCESSIBILITY_YES);
}

setItemViewLayoutParams(child, position);

if (AccessibilityManager.getInstance(mContext).isEnabled()) {
if (mAccessibilityDelegate == null) {
mAccessibilityDelegate = new ListItemAccessibilityDelegate();
}
if (child.getAccessibilityDelegate() == null) {
child.setAccessibilityDelegate(mAccessibilityDelegate);
}
}

Trace.traceEnd(Trace.TRACE_TAG_VIEW);

return child;
}

首先会执行 mRecycler.getScrapView() 从废弃缓存中的获取 View 对象,此时该 View 对象必然是 null,然后把该对象传递给 mAdapter.getView();至此就到了非常熟悉的 Adapter 了,其中有一种常见的 ListView 优化方法就是通过 ViewHolder 减少创建 View 对象的次数:

1
2
3
4
5
6
7
8
9
10
11
12
13
14
15
16
17
18
19
20
override fun getView(position: Int, convertView: View?, parent: ViewGroup?): View? {
val holder: TestViewHolder
val v: View
// 如果没有从废弃缓存中获取到 View 对象,则创建一个,把 ViewHolder 对象绑定到该 View 的 tag 属性上,同时 ViewHolder 持有该 View 的引用
// 如果获取到了,就直接从该 View 中获取 ViewHolder,不必重新创建新的 View 对象
if (convertView == null) {
v = View.inflate(context, R.layout.my_text_view, null)
holder = TestViewHolder(v)
v.tag = holder
} else {
v = convertView
holder = v.tag as TestViewHolder
}
holder.str.text = data[position]
return v
}

class TestViewHolder(viewItem: View) {
var str: TextView = viewItem.findViewById(R.id.tv) as TextView
}

第二次 onLayout

至此就获取到了需要显示的 View 对象,并通过 setupChild 填充到 ListView 中,不要忘记此时还在 fillDown 函数中的 while 循环当中,当 ListView 加载完首屏数据后就会跳出该循环,所以不会因为数据过多导致 OOM,不过这仅仅是首次 onLayout 的流程,接下来还有第二次 onLayout,过程和首次还是有些不同的,首先还是先从 layoutChild 来看:

1
2
3
4
5
6
7
8
9
10
11
12
13
14
15
16
17
18
19
20
21
22
23
24
25
26
27
28
29
30
31
32
33
34
35
36
37
38
39
40
41
42
43
44
45
46
47
48
49
50
51
52
53
54
55
56
57
58
59
60
61
62
63
64
65
66
67
68
69
70
71
72
73
74
75
76
77
78
79
80
81
82
83
84
85
86
87
88
89
90
91
92
93
94
95
96
97
98
99
100
101
102
103
104
105
106
107
108
109
110
111
112
113
protected void layoutChildren() {
...
// 由于此前已经填充了 ListView,此时 childCount 不为 0,把当前所有子 View 都缓存到了活跃缓存区中
if (dataChanged) {
for (int i = 0; i < childCount; i++) {
recycleBin.addScrapView(getChildAt(i), firstPosition+i);
}
} else {
recycleBin.fillActiveViews(childCount, firstPosition);
}

// Clear out old views
// 该函数会清空 ListView 中所有的 View 对象,但是不用担心,这些 View 对象已经被缓存了
detachAllViewsFromParent();
recycleBin.removeSkippedScrap();

// mLayoutMode 默认值为 LAYOUT_NORMAL,所以代码会执行到 default 中
switch (mLayoutMode) {
case LAYOUT_SET_SELECTION:
if (newSel != null) {
sel = fillFromSelection(newSel.getTop(), childrenTop, childrenBottom);
} else {
sel = fillFromMiddle(childrenTop, childrenBottom);
}
break;
case LAYOUT_SYNC:
sel = fillSpecific(mSyncPosition, mSpecificTop);
break;
case LAYOUT_FORCE_BOTTOM:
sel = fillUp(mItemCount - 1, childrenBottom);
adjustViewsUpOrDown();
break;
case LAYOUT_FORCE_TOP:
mFirstPosition = 0;
sel = fillFromTop(childrenTop);
adjustViewsUpOrDown();
break;
case LAYOUT_SPECIFIC:
final int selectedPosition = reconcileSelectedPosition();
sel = fillSpecific(selectedPosition, mSpecificTop);
/**
* When ListView is resized, FocusSelector requests an async selection for the
* previously focused item to make sure it is still visible. If the item is not
* selectable, it won't regain focus so instead we call FocusSelector
* to directly request focus on the view after it is visible.
*/
if (sel == null && mFocusSelector != null) {
final Runnable focusRunnable = mFocusSelector
.setupFocusIfValid(selectedPosition);
if (focusRunnable != null) {
post(focusRunnable);
}
}
break;
case LAYOUT_MOVE_SELECTION:
sel = moveSelection(oldSel, newSel, delta, childrenTop, childrenBottom);
break;
default:
// 此时 childCount 非 0,所以这次会执行 fillSpecific
if (childCount == 0) {
if (!mStackFromBottom) {
final int position = lookForSelectablePosition(0, true);
setSelectedPositionInt(position);
sel = fillFromTop(childrenTop);
} else {
final int position = lookForSelectablePosition(mItemCount - 1, false);
setSelectedPositionInt(position);
sel = fillUp(mItemCount - 1, childrenBottom);
}
} else {
if (mSelectedPosition >= 0 && mSelectedPosition < mItemCount) {
sel = fillSpecific(mSelectedPosition,
oldSel == null ? childrenTop : oldSel.getTop());
} else if (mFirstPosition < mItemCount) {
sel = fillSpecific(mFirstPosition,
oldFirst == null ? childrenTop : oldFirst.getTop());
} else {
sel = fillSpecific(0, childrenTop);
}
}
break;
}

...
}
```
`fillSpecific` 函数的作用和 `fillDown` 大相径庭,暂时不用关心它的内部细节,`fillSpecific` 内部最终也会执行 `makeAndAddView`,这个时候再次执行 `mRecycler.getActiveView` 就可以获取到之前已经缓存过的 View 对象了,接着执行 `setupChild`,这时需要注意该函数的最后一个参数,该参数表示当前的 View 对象是否被添加到 Window 过,看源码获取该参数的主要用途:

```Java
private void setupChild(View child, int position, int y, boolean flowDown, int childrenLeft, boolean selected, boolean isAttachedToWindow) {
...
if ((isAttachedToWindow && !p.forceAdd) || (p.recycledHeaderFooter
&& p.viewType == AdapterView.ITEM_VIEW_TYPE_HEADER_OR_FOOTER)) {
attachViewToParent(child, flowDown ? -1 : 0, p);

// If the view was previously attached for a different position,
// then manually jump the drawables.
if (isAttachedToWindow
&& (((AbsListView.LayoutParams) child.getLayoutParams()).scrappedFromPosition)
!= position) {
child.jumpDrawablesToCurrentState();
}
} else {
p.forceAdd = false;
if (p.viewType == AdapterView.ITEM_VIEW_TYPE_HEADER_OR_FOOTER) {
p.recycledHeaderFooter = true;
}
addViewInLayout(child, flowDown ? -1 : 0, p, true);
// add view in layout will reset the RTL properties. We have to re-resolve them
child.resolveRtlPropertiesIfNeeded();
}
...
}

可以看出如果之前没有添加过执行 addViewInLayout,否则就执行 attachViewToParent,这两个函数的关键区别在于 addViewInLayout 是往 ViewGroup 中添加一个新的子 View,会重新渲染。而 attachViewToParent 则是将之前通过 detachViewFromParent 移出 ViewGroup 的子 View 重新显示出来,不会重新渲染,至此两次 onLayout 已经执行结束

滑动

在 ListView 滑动过程中,会执行以下函数:

最终还是会执行 makeAndAddView() 函数:

1
2
3
4
5
6
7
8
9
10
11
12
13
14
15
16
17
18
19
20
21
private View makeAndAddView(int position, int y, boolean flow, int childrenLeft,
boolean selected) {
if (!mDataChanged) {
final View activeView = mRecycler.getActiveView(position);
if (activeView != null) {
// Found it. We're reusing an existing child, so it just needs
// to be positioned like a scrap view.
setupChild(activeView, position, y, flow, childrenLeft, selected, true);
return activeView;
}
}

// Make a new view for this position, or convert an unused view if
// possible.
final View child = obtainView(position, mIsScrap);

// This needs to be positioned and measured.
setupChild(child, position, y, flow, childrenLeft, selected, mIsScrap[0]);

return child;
}

由于此时 mRecycler.getActiveView 已经获取不到 activeView,所以还是会往下执行到 obtainView(),在 obtainView() 中可以通过 mRecycler.getScrapView 从废弃缓存中获取到 View 进行复用,之后的流程和 onLayout 时相同,到此 ListView 的缓存分析已经结束

RecyclerView 分析

在刚开始使用 RecyclerView 的时候,经常会发生由于忘记设置 LayoutManager 导致布局渲染不出来,来看一下 RecyclerView#LayoutManager 的部分官方解释:

A LayoutManager is responsible for measuring and positioning item views within a RecyclerView as well as determining the policy for when to recycle item views that are no longer visible to the user

LayoutManager 负责测量和定位 RecyclerView 中的 item,并且负责确定何时回收这些不可见 item 的策略,在 RecyclerView 中有一个函数 onLayoutChildren()

1
2
3
public void onLayoutChildren(Recycler recycler, State state) {
Log.e(TAG, "You must override onLayoutChildren(Recycler recycler, State state) ");
}

这个函数的作用是列出 adapter 中所有的 view,而且每个不同的 LayoutManager 都需要重写该函数,就从 LinearLayoutManager#onLayoutChildren 开始分析,在 onLayoutChildren 中也有调用了和 fillActiveViews() 功能相似的一个函数 detachAndScrapAttachedViews() 来缓存之前所有的 View,接着执行 fill()RecyclerView 进行填充:

1
2
3
4
5
6
7
8
9
10
11
12
13
14
15
16
17
18
19
20
21
22
23
24
25
26
27
28
29
30
31
32
33
34
35
36
37
38
39
40
41
42
43
44
45
46
47
48
49
50
51
52
53
54
55
int fill(RecyclerView.Recycler recycler, LayoutState layoutState,
RecyclerView.State state, boolean stopOnFocusable) {
// max offset we should set is mFastScroll + available
final int start = layoutState.mAvailable;
if (layoutState.mScrollingOffset != LayoutState.SCROLLING_OFFSET_NaN) {
// TODO ugly bug fix. should not happen
if (layoutState.mAvailable < 0) {
layoutState.mScrollingOffset += layoutState.mAvailable;
}
recycleByLayoutState(recycler, layoutState);
}
int remainingSpace = layoutState.mAvailable + layoutState.mExtra;
LayoutChunkResult layoutChunkResult = mLayoutChunkResult;
while ((layoutState.mInfinite || remainingSpace > 0) && layoutState.hasMore(state)) {
layoutChunkResult.resetInternal();
if (VERBOSE_TRACING) {
TraceCompat.beginSection("LLM LayoutChunk");
}
layoutChunk(recycler, state, layoutState, layoutChunkResult);
if (VERBOSE_TRACING) {
TraceCompat.endSection();
}
if (layoutChunkResult.mFinished) {
break;
}
layoutState.mOffset += layoutChunkResult.mConsumed * layoutState.mLayoutDirection;
/**
* Consume the available space if:
* * layoutChunk did not request to be ignored
* * OR we are laying out scrap children
* * OR we are not doing pre-layout
*/
if (!layoutChunkResult.mIgnoreConsumed || mLayoutState.mScrapList != null
|| !state.isPreLayout()) {
layoutState.mAvailable -= layoutChunkResult.mConsumed;
// we keep a separate remaining space because mAvailable is important for recycling
remainingSpace -= layoutChunkResult.mConsumed;
}

if (layoutState.mScrollingOffset != LayoutState.SCROLLING_OFFSET_NaN) {
layoutState.mScrollingOffset += layoutChunkResult.mConsumed;
if (layoutState.mAvailable < 0) {
layoutState.mScrollingOffset += layoutState.mAvailable;
}
recycleByLayoutState(recycler, layoutState);
}
if (stopOnFocusable && layoutChunkResult.mFocusable) {
break;
}
}
if (DEBUG) {
validateChildOrder();
}
return start - layoutState.mAvailable;
}

fill() 中不停判断剩余空间和是否有更多的 item,并且执行 layoutChunk() 填充布局,在 layoutChunk() 中又执行了 layoutState.next() 获取下一个需要显示的 View:

1
2
3
4
5
6
7
8
 View next(RecyclerView.Recycler recycler) {
if (mScrapList != null) {
return nextViewFromScrapList();
}
final View view = recycler.getViewForPosition(mCurrentPosition);
mCurrentPosition += mItemDirection;
return view;
}

此时就能看到 RecyclerView 回收机制的关键函数 getViewForPosition()RecyclerRecyclerView 实现回收机制的关键类,和 ListView 缓存机制不同的是,RecyclerView 缓存的是 ViewHolder,它实现了四级缓存:

  • mAttachedScrap - 缓存屏幕上的 ViewHolder
  • mChangedScrap - 已经分离的 ViewHolder
  • mCachedViews - 缓存屏幕外的 ViewHolder,默认为2个,ListView 对于屏幕外的缓存都会调用getView()
  • mRecyclerPool - 用于多个 RecyclerView 的缓存池
  • mViewCacheExtension - 用户定制,默认不实现

getViewForPosition() 最终会执行 tryGetViewHolderForPositionByDeadline() 获取 ViewHolder 对象,具体流程图:

RecyclerView 的优势在于 mCacheViews 的使用,可以做到屏幕外的列表项 ItemView 进入屏幕内时也无须 bindView 快速重用;mRecyclerPool 可以供多个 RecyclerView 共同使用

Groovy 入门 《Android 开发艺术探索》- 第二章内容总结

评论

Your browser is out-of-date!

Update your browser to view this website correctly. Update my browser now

×